VPN Setup
Windows
Windows 2.0 (NEW VERSION, USE THIS ONE)
Video tutorial:
Watch it on YouTubeStep 1: Download the app
Step 2: Install the app
- Find the app you just downloaded (either on the bottom right or left of your screen or in your downloads folder). Click on it to run it.
- A box will appear. Click "next", "I agree", "Install".
- When it’s done installing, click "next", and then "finish".
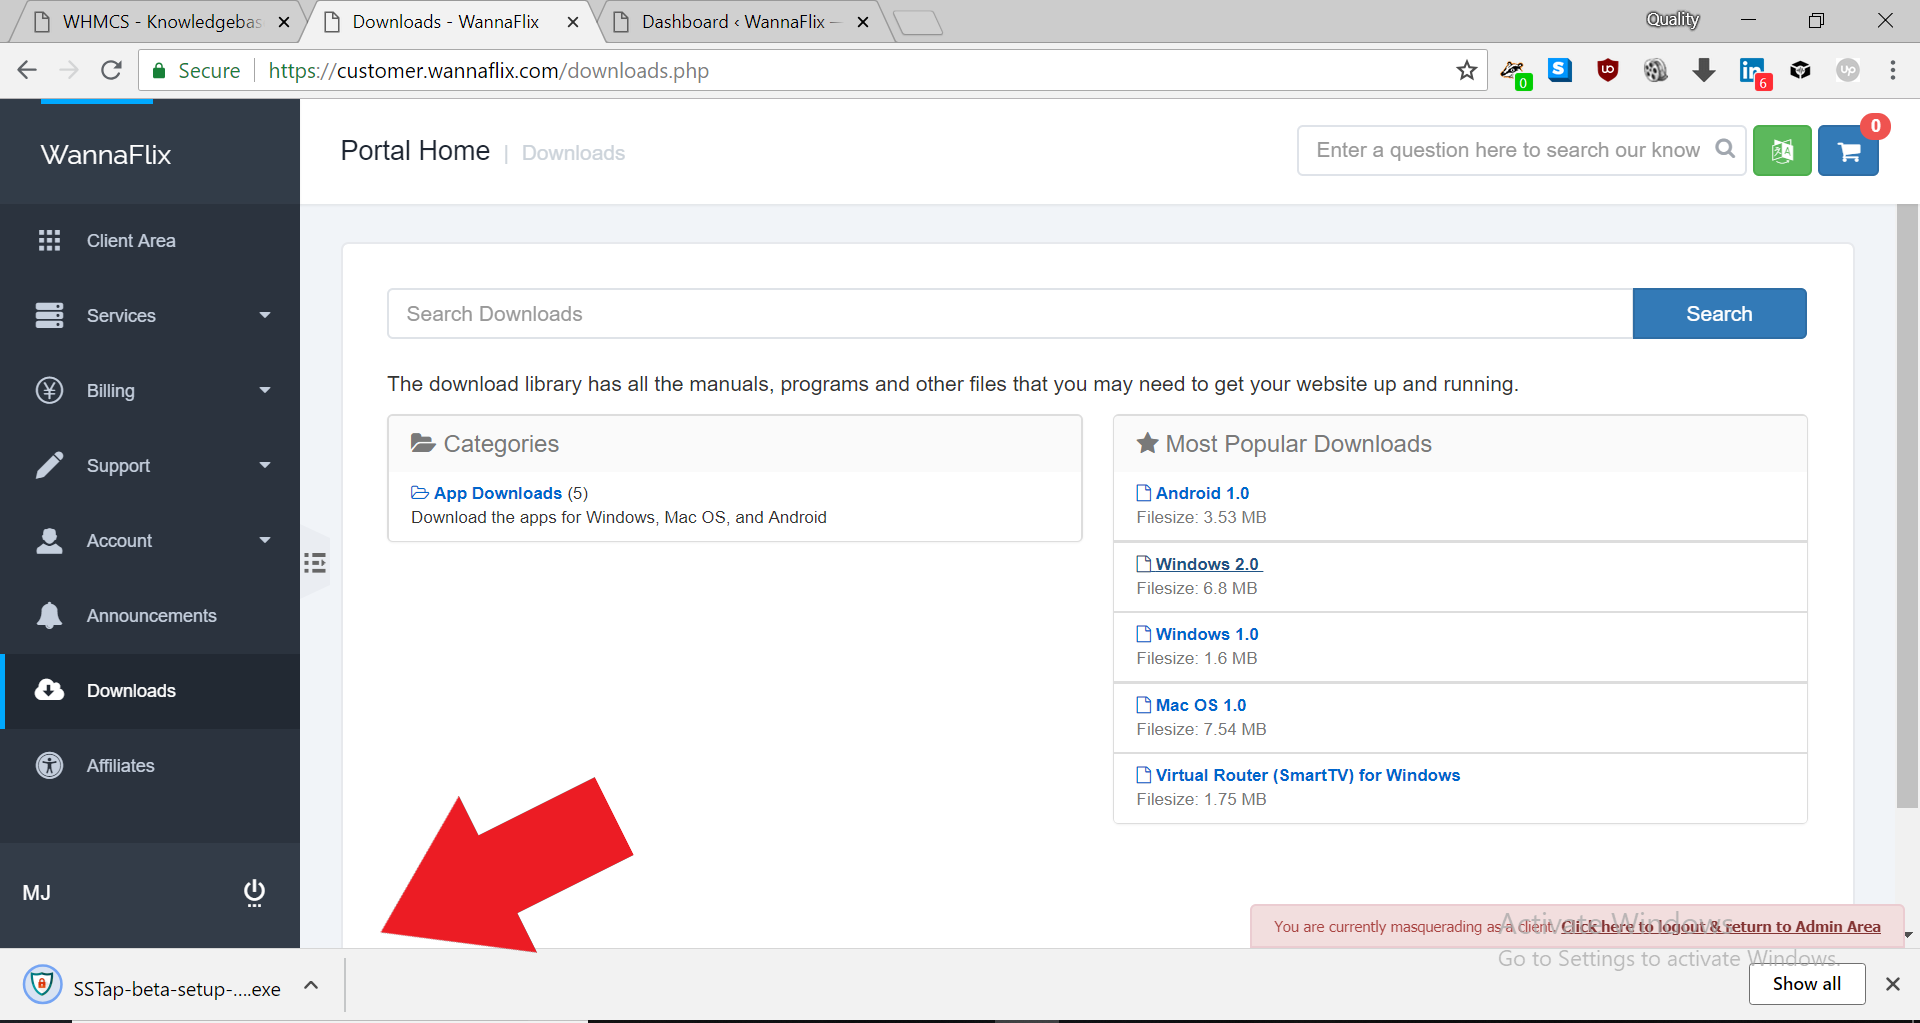
Step 3: Copy your subscribe link
- Login to your client area
- Go to this page
- Click "copy"

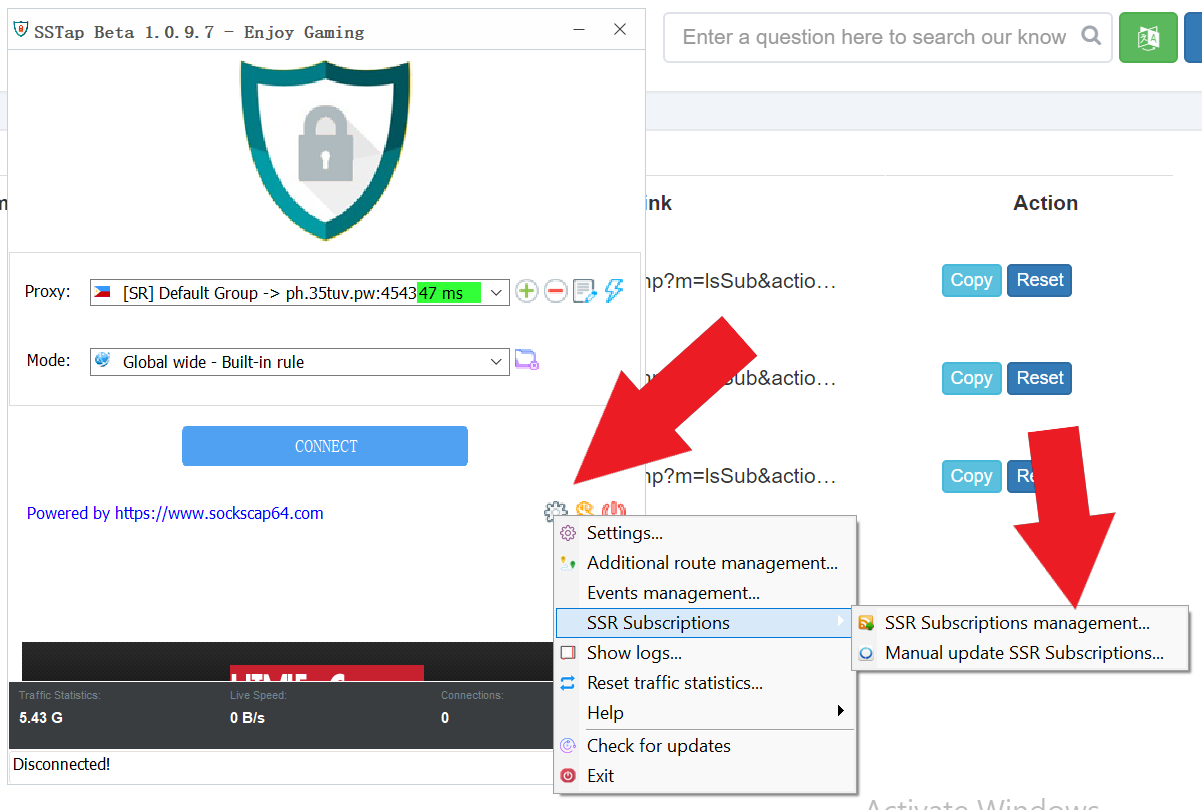
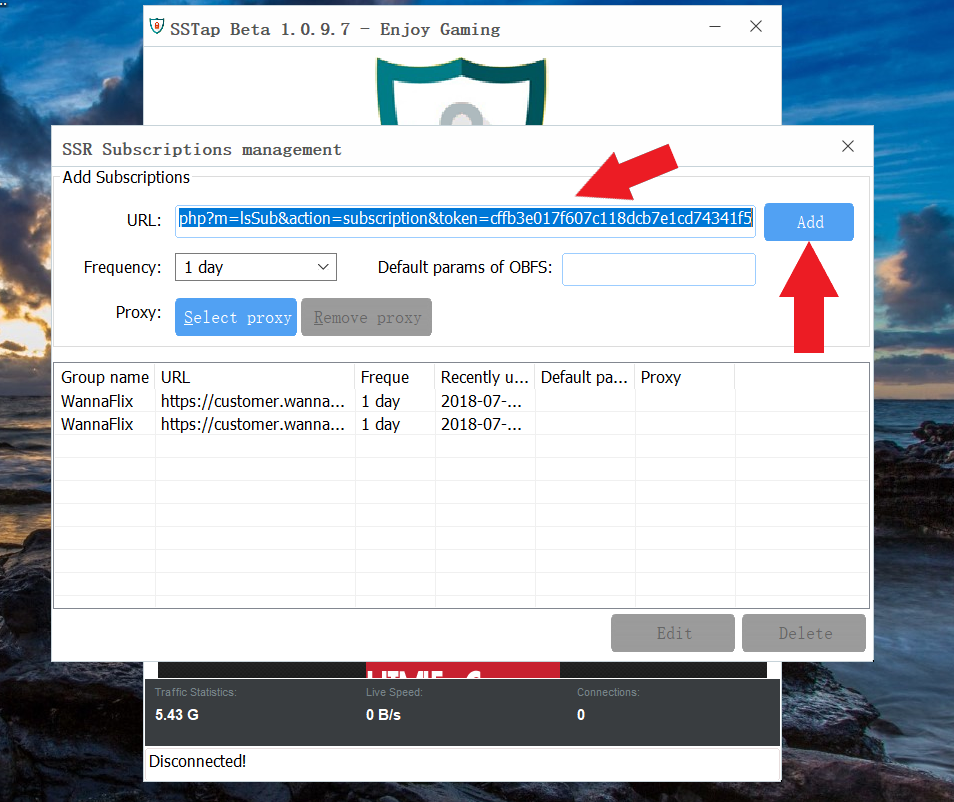
Step 4: Paste the link in your app
- See the cogs icon? Click on it, and go to SSR subscriptions > SSR Subscriptions Management.
- Paste the subscribe link you copied into the URL bar and click Add. Then close the SSR Subscriptions Management box.
- The app will then attempt to authenticate you. If everything is fine, it will add in your servers to the app.
Step 5: Connect
Select your preferred server from the dropdown menu and click Connect.
NOTE: You can always find the app on the task bar or the tray on the bottom of the screen.
Windows 1.0 (OLD VERSION, MORE STABLE BUT LESS FEATURES AND HARDER TO USE)
Video tutorial: https://youtu.be/tnygZoFZOA4
PART 1: Download the app
Step 1: Login to your account
Step 2: Go to the "downloads" section on the left-hand menu
Step 3: Go to App downloads and download the Windows zip file
PART 2: Unzip the file and open the app
Step 1: Find the downloaded zip file
Step 2: Copy the file to another location where you can find it easily
Step 3: Unzip the file (right-click > extract all)
Step 4: Open the unzipped folder and double-click on the "ShadowsocksR-dotnet4.0" file (if you do not have the .NET 4.0 framework, then open the "ShadowsocksR-dotnet2.0" one, or Download NET framework)
Step 5: If you get any popups or if your antivirus says anything, select yes / allow access / create exception, according to the situation to allow the app to run
Step 6: Close the program window
Step 7: Disable the VPN as no servers have been added yet (IMPORTANT). In the bottom right of your screen (also called the tray), you’ll see a paper airplane icon. If you can’t find it, click on the up arrow to show more icons. Right-click it to show the menu (don’t left-click; it will open the server configurations page). Go to Mode -> Disable system proxy
PART 3: Setup the servers
Step 1: Login to your account on our website and go to the server list (under “services”)
Step 2: Next to each server, you will have two buttons. Select the SSR QR one. A QR code will appear.
Step 3: In the bottom right of your screen (also called the tray), you’ll see a paper airplane icon. If you can’t find it, click on the up arrow to show more icons
Step 4: Right-click it to show the menu (don’t left-click; it will open the server configurations page)
Step 5: Go to servers > scan QR code from screen
Step 6: Do the same for all the servers you want to add
Step 7: Disable “Load balance” in the main app menu
PART 4: Connecting to the servers
Step 1: Right-click on the paper airplane icon in the tray on the bottom right corner of your screen
Step 2: Click mode > Global
Step 3: To choose a server, right-click on the paper airplane icon and you'll find the server list under the "Servers" -> Wannaflix tab
Step 4: Disable load balance (right-click on the icon, and disable the option)
IMPORTANT:
Each time you connect to the VPN or change server, make sure to reset the Netflix app/restart your browser so it recognizes the new IP address.
It is best to create a new profile for each region you are trying to access. Otherwise, Netflix may not change the region despite your having a different IP address.
Tips:
To create a desktop icon, right-click on the "ShadowsocksR-dotnet4.0" file and go to send to > desktop
Mac OS
Step 1: Download the app
Click here to download the app
Step 2: Install the app
If you get an error that says the app can't be opened because it's from an unidentified developer, follow these steps.
- Hold down the Control key on your keyboard while you click the application icon and then choose Open while still holding down the Control key.
- Choose Open
After you open the app, you will see an icon near the top of the screen that looks like a small paper airplane.
Step 3: Copy the subscribe link
- Login to your client area
- Go to this page
- Click "copy"
Step 4: Paste the subscribe link
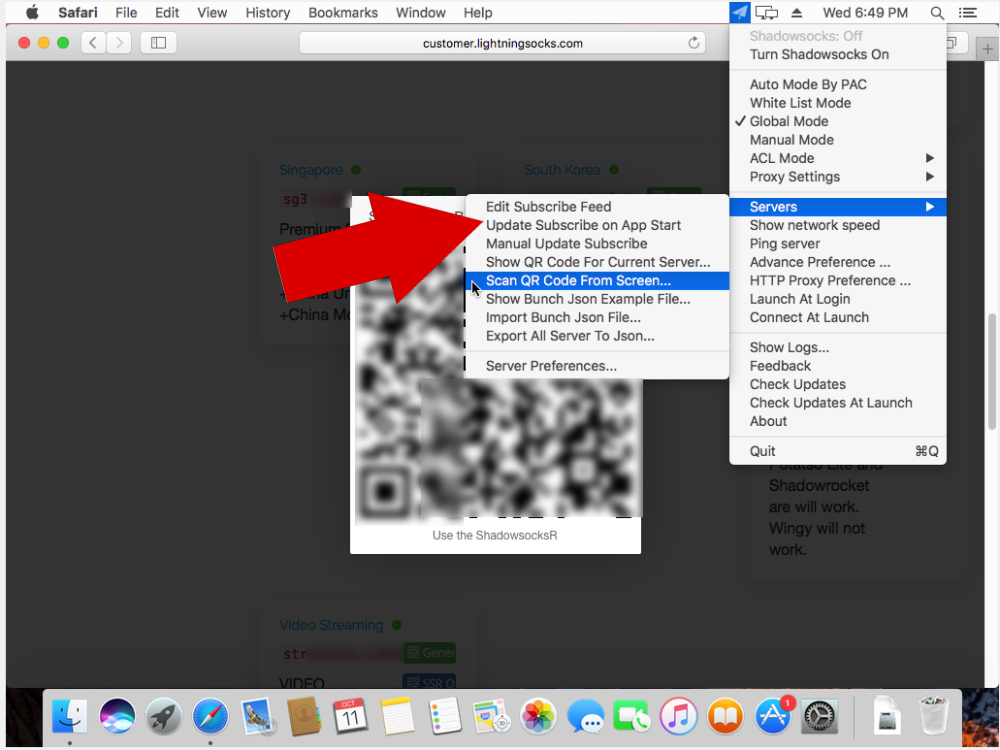
- After you open the app, you will see an icon near the top of the screen that looks like a small paper airplane.
- Click on the airplane icon and go to server ---> Edit subscribe feed
- Paste the subscribe link you copied into the "subscribe feed" box and click save
- Click on the airplane icon again and go to server ---> Update Subscribe on App start, then click on server ---> Manual update subscribe to get the server list.

Step 5: Final adjustments
- Change the mode to Global Mode
.png)
Step 6: Connect
Once you have added the servers that you want to use, choose one of them and then enable the option "Turn Shadowsocks On".
If you want to disconnect from the proxy, then choose "Turn Shadowsocks Off."
Android
Video tutorial:
Watch it on YouTubeStep 1: Download the app
Click here to download the app
Step 2: Install the app
Find the apk (likely in your downloads) and click on it to launch the installation. Make sure to click allow on any popup that may appear
Step 3: Copy the subscribe link
- Login to your client area
- Go to this page
- Click "copy"
Step 4: Paste the subscribe link
- Open the app and click on "ShadowsocksR" on the top bar and then click on the "+" button on the botton right.
- Click on "Add/Update SSR Subscription". Delete the default subscription by swiping it all the way to the right and then selecting the "delete the nodes too" option.
- Click on "Add URL" and paste the subscribe link you copied. Click OK.
- Switch "Auto Update" on. Finally, click on "Save and Update".
Step 5: Connect
- Choose the server you want to connect to
- Scroll down and enable "UDP Forwarding"
- Click on the paper-airplane icon on the top bar to connect to the server. Allow any popup that may appear.
How to Delete a Server
To remove a server profile, press and hold your finger over the profile name and then swipe to the left or right.
iOS
*** Unfortunately, this iOS app currently doesn't support using the subscribe link. A third party app does, and you'll find detailed steps in our "Using a third-party app" guide below. If you are a poweruser, we'd recommend going with the third-party app. ***
Step 1: Download the app
Click here to download the app
Step 2: Add the servers
OPTION 1: IF YOU HAVE ANOTHER DEVICE (Computer/tablet)
- On another device (maybe your computer or phone), login to your account and go to the server list (under "services")
- Next to each server, you will have two buttons. Select the "General" one. A QR code will appear.
- In your SsrConnectPro app, click on the button on the top-left (looks like a scan icon) and scan the QR code from the screen
- Do the same for all the servers you want to add
OPTION 2: IF YOU ONLY HAVE YOUR iOS DEVICE WITH YOU
- Login to your account and go to the server list (under "services")
- Next to each server, you will have two buttons. Select the "General" one. A QR code will appear.
- Long-press the QR code and select Open in "SsrConnectPro"
- Do the same for all the servers you want to add
Step 3: Connect
- Click on the server under "CURRENT ONLINE" and choose the server you want to connect to
- Click on "Connect". It will ask you to add a new VPN Configuration. Click "Allow" and input your device password/touch ID
***The third party app normally costs $3. However, we have contacted the developer and he has accepted to allow us unlimited downloads on the account below (for an undisclosed fee). Feel free to use the account below to download the app.***
***THIS APP IS NO LONGER AVAILABLE ON THE CHINESE APP STORE. PLEASE USE OUR ACCOUNT TO DOWNLOAD THE APP INSTEAD.***
Step 1: Download and install the app
Login to our iTunes account:
iTunes ID: [email protected]
Password: tgnotKwbp0
To log out from your iTunes account and login to ours on iOS 11, open your App Store, go to the "Updates" section (on the bottom menu), and click on the circle with a head icon on the top right corner.
Then, click sign out. Please make sure you know your iTunes login details for when you 'll need to log back in. We are not responsible for iTunes login related issues.
Finally, enter our details to login to our account.
Once logged in:
- Go to the app store and search for "Shadowrocket" (or click here to be redirected automatically)
- Download the app
- Find the app and open it
Step 2: Copy the subscribe link
- Login to your client area
- Go to this page
- Click "copy"
Step 3: Paste the subscribe link
- Open the Shadowrocket app.
- Click on the "+" icon on the top right corner.
- Change the "Type" to subscribe.
- Paste the link into the URL box and click Done.
Step 4: Change app settings
- At the top of the server list, change the "Global Routing" to Proxy
Step 5: Connect
- Select a server from the server list and toggle switch on the top right.
- If it is the first time for you to set up the app, it will ask you to allow the creation of a VPN profile. Click allow and enter your pin/touch ID/face ID.
- Otherwise, you will be connected.
IMPORTANT: The guides are finished but we still haven't uploaded the pictures/screenshots. We will do so before the end of November. We appologize for any inconvenience.
YOU CAN FIND SCREENSHOTS ON GOOGLE IMAGES. Simply search for ""[operating system] shadowsocks", for example, "OpenWRT Shadowsocks".
Padavan
Note: Padavan routers already have shadowsocks pre-installed. We only need to add the servers and tweak the settings.
Step 1: Log into your Padavan router
- Connect to your router's WiFi
- Open your browser on your computer and type 192.168.123.1 on the url bar
- Enter your username and password to login to the router's control panel (if it's the first time, the username and password are both 'admin')
Step 2: Copy your subscribe link
- On a new tab, login to your WannaFlix client area
- Go to this page
- Copy your subscribe link by clicking on the "copy" button
Step 3: Paste your subscribe link
- On the menu bar on the left of your Padavan control panel, go to "Shadowsocks"
- On the top bar of the Shadowsocks panel, click on "节点配置" or "Shadowsocks Server" (depending on the language installed)
- Paste the Subscribe link into the box next to "ssr_服务器订阅" and click on the light blue button next to it (labelled "更新") to download the server list
Step 4: Choose your server
- Choose the server you'd like to connect to from the list (tick the box next to it)
- Scroll down and click on the green button labelled "应用主SS" to set it as the main server
- Select a backup server from the list, scroll down and click on the second green button labelled "应用备SS" to add it as a backup server (in case the main one is down)
- Click the blue "Apply" button
Step 5: Connect
- Scroll back up and change the options to match the one in the picture below
- Click "Apply"
- If you haven't done so already, toggle the switch on (as in the picture above) and click "Apply" to connect
To switch servers, simply select another one from the list and set it as the main server by clicking on the "应用主SS" button. Then click "Appply". Finally, scroll back up, toggle the switch off, click "Apply", and toggle the switch back on and click "Apply" to disconnect from the old server and reconnect to the new one.
Merlin
Step 1: Login to your router
- Connect to your router's WiFi
- Open your browser on your computer and type your router's IP address on the url bar (you can check online or check the back of your router to get your router's IP address; it likely start with 192.168)
- Enter your username and password to login to the router's control panel
Step 2: Enable JFFS and SSH
- Go to Administration > System
- Enable "Enable JFFS partition" and "Format JFFS partition at next boot"
- Enable SSH as "LAN only" and enable "Allow SSH password login"
- Reboot your router
Step 3: SSH into your router
- Download, install, and run PuTTy (you can get download it here)
- Input your router's IP address as Host Name, 22 as Port number, and select SSH as the connection type
- Click "Open"
- Enter your router's username and password when prompted
Step 4: Download and install Shadowsocks
Copy and paste the following code into your SSH command line:
cd /tmp

wget -N -O shadowsocks.tar.gz https://customer.wannaflix.com/

tar -zxvf /tmp/shadowsocks.tar.gz

chmod +x /tmp/shadowsocks/install.sh

sh /tmp/shadowsocks/install.sh

reboot
Shadowsocks should now be successfully installed
Step 5: Setup Shadowsocks
- Login to your router
- Go to the "Software Center"
- You should see "Shadowsocks" in the list of installed software. Click on it
- Go to "更新管理"
Step 6: Copy your subscribe link
- On a new tab, login to your WannaFlix client area
- Go to this page
- Copy your subscribe link by clicking on the "copy" button
Step 7: Paste your subscribe link
- Go back to your router's settings tab
- Paste the subscribe link in the box (see picture)
- Click on “保存并订阅” (see picture)
Step 8: Choose your server and connect
- Go back to the first tab on the Shadowsocks router panel (click on "账号设置" (account settings))
- Select your server from the first drop-down menu
- Choose "全局代理模式" (should be number 5 in the list) for the mode from the second drop-down menu
- Click "提交" (submit)
For more info, please have a look at these additional resources:
http://blog.sina.com.cn/s/blog_538ecd820102wpbw.html
https://paper.tuisec.win/detail/6efb5a43a6b2dbf
OpenWRT
NOTE: We only support LEDE 17.01 and later, and OpenWRT 18.06 and later
Step 1: SSH into your router
- Download, install, and run PuTTy (you can download it here)
- Input your router's IP address as Host Name (it should be 192.168.1.1), 22 as Port number, and select SSH as the connection type
- Click "Open"
- Enter your router's username and password when prompted
For more information on how to SSH into OpenWRT, please see https://openwrt.org/docs/guide-quick-start/sshadministration
Step 2: Install Shadowsocks
Copy and paste the following code into your SSH command line
(when you are promted, install shadowsocks, chinadns and dns-forwarder):
wget -qO- http://openwrt-dist.sourceforge.net/auto_install.sh | sh

# When you are promted, install shadowsocks, chinadns and dns-forwarder

opkg install ip-full iptables-mod-tproxy
Shadowsocks should now be successfully installed
Step 3: Access the server configuration panel
- Open your web browser and login to your router's control panel (192.168.1.1)
- Go to services > shadowsocks
- Go to the "Server Manage" tab (the second tab from the left) and click Add to add a server configuration
Step 4: Add a new server
- Open a new tab, login to your client area, and click on your active subscription
- Scroll down to see your server options and server list
- Choose a server you'd like to add. Copy the server url, and go to http://ping.pe ; then paste the url in the box and click enter to get the IP address (unlike the other apps, the router only accepts IP addresses).
- Copy the IP address and paste it in the "Server address" box of the router's config
- Add in an appropriate name as Alias (i.e. US Netflix or something similar)
- As for the rest of the settings, Go back to your router settings and fill in the server details according to your subscription details
(You'll need to copy the Server Port, Password, and Encrypt Method) - Leave "TCP Fast Open" and "TCP no-delay" disabled, and leave "Plugin Arguments" blank
- Finally, click "Save & Apply"
You'll have to do so for each server you'd like to add
Step 5: Connect
- Go back the "General Settings"
- Select the server you want to connect to as both the "Main server" and "UDP-Relay Server" under the Transparent Proxy heading
You're connected!
For more info please have a look at these additional resources:
http://openwrt-dist.sourceforge.net/
https://cokebar.info/archives/664